I've had a small goldfish and koi pond at my house in Toronto since around 1979 which has given me great enjoyment. Having moved to the 'countryside' of Georgian Bay I felt it was a great opportunity to build a bigger one, this time, a "swimming pond", using only biological filtering.
The first step was to come up with a design and figure out an approximate size and location for the pond. This process took a couple of years and we were helped by hosting a permaculture workshop on our property. During this workshop, a lot of creative ideas and suggestions were proposed which helped us in our thinking process. After this we decided to move the proposed location from the back to the front of the house to keep it away from the septic bed area.
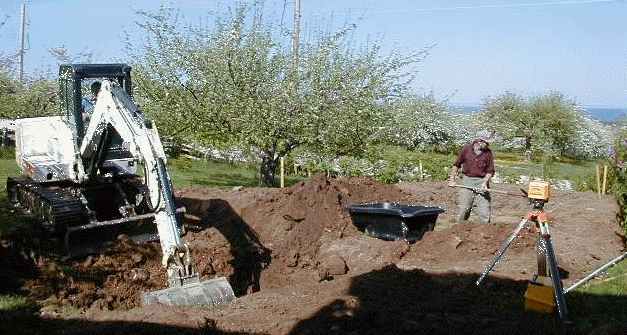
On May 15 of 2000 I hired a guy with a fancy machine like a mini excavator to come and dig a hole in the ground. First I laid out the area with stakes and a spray bomb.
It's amazing how much work machines can do when it comes to digging ... makes you wonder how our ancestors did any kind of construction without them in the past! The guy was pretty good with the machine and very proud of what it could do.
Perhaps other people have had the fantasy of operating one of those earth-moving machines - I certainly have had. I can watch a machine working for quite a while with great interest. So when Dan the operator asked if he could take a look at my digital camera, I gave him a working tour of it, and then asked when was I going to try out his machine.
To my delight he said, "There it is, go for it", just like that! I explained that I had no idea where to start or how to operate any of the controls. So Dan gave me a quick demonstration and then turned me loose on it. I had a blast heaving some earth around and digging out some of my own pond. Of course it was taking me much longer to do every move as I had to think about everything first so I turned it back to him after about 20 minutes (I was paying him by the hour). But even in that time I was starting to feel more comfortable with the controls. He flattered me by saying that he thought I had good hand-eye coordination and did add that there are many people who are not able to learn how to run it.
That's me with the shovel in my hand below. Jennifer came out to take a picture, just AFTER my session in the cab, unfortunately. But that's the pile of dirt I dug out on my right ;-)
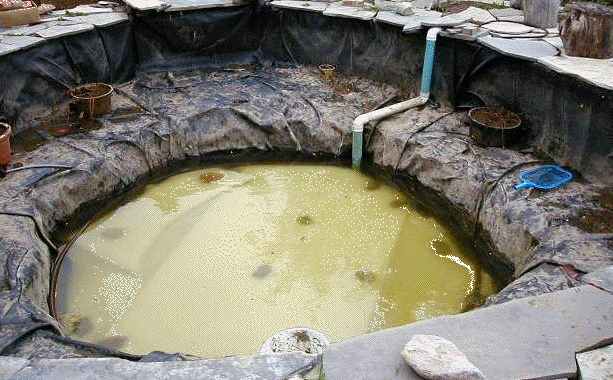
After Dan left with his big machine it was down to me and my shovel to dig the remains into something that actually looked like a pond. This took almost 2 months with limited spare time. Then came the moment to see if it would hold water. Because the ground has a lot of clay in it I hoped that we wouldn't have to use a liner. That would save a lot of work and expense. We filled it up over several days by pumping water from the drainage ditch by the road (quite clean and filtered by lots of bullrushes and plants). We also used water from the rain barrels but tried not to use our valuable well water.
It was exciting to see real WATER in the hole finally ..
made it start to feel like a pond rather than a construction site.
Unfortunately, the level would soon drop a foot or more from the
top and the ground was clearly too porous to hold the water the
way we wanted.
It was time to get serious about a pond liner. Several garden
supplies carried the EPDM we needed, all very expensive. I bought
enough to do both the main pond, the satellite pond and the stream
going to a second satellite pond made of plastic. Having the 3
ponds plus the stream allows for a great deal of bio-filtering
plus different habitats for fish and wildlife. Also it's easy to
keep the water running during a repair to one section.
After quite a bit of thinking and research I decided to construct
the biofilter along the lines of an 'under-gravel' filter for a
fish tank. The external pump draws all the water through a
manifold of pipes in the bottom of the pond, through a thickness
of porous material with a large surface area. This material
becomes colonized by bacteria. As long as the bacteria are
supplied with oxygen from the water (falls) they digest algae and
bi-products of the fish and keep the water clear without using
chemicals. Materials most often used for this are pea gravel or
lava rock. The lava rock comes from volcanoes and is mostly used
in barbecues. This rock is quite light and has a large surface
area. Unfortunately there are no active volcanoes in Canada so
it's all imported and packed up in small bags for barbecues. This
makes it expensive to buy. Pea gravel is readily available but is
very HEAVY if you have to dig it out from the bottom of the pond
for cleaning! Eventually it tends to silt up and allows fewer and
fewer channels for the water.
Therefore I decided to use a manufactured product that comes in 5' rolls. It's a very tough, woven mat, 2" thick and is almost indestructible. A big advantage is that it is so light you can just lift the whole thing out for cleaning. Unfortunately it's quite expensive at about $16CDN per running foot. However I decided to go with it anyway, figuring the benefits over say 5-10 years would offset the costs.
The picture below shows the installation of the first liner in the satellite pond and the temporary layout of the pipes for the under gravel filter in the main pond. This was September 1, 2001.
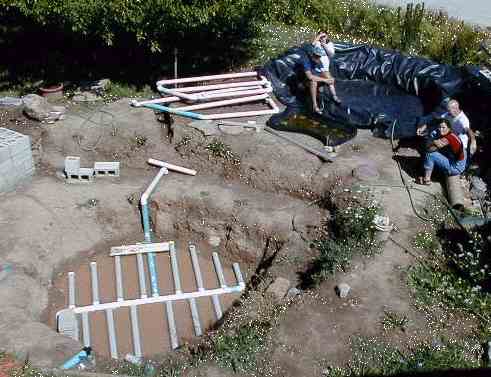
My goal for this first year was to get the liners in place, as well as the underground plumbing, before the freeze up. The first liner went in very easily but the big one gave us more of a challenge. People had recommended that we try to get the walls vertical behind the liner and so I went around shoring up the walls by placing plywood sections against the sloping parts then filling in behind the plywood with a kind of liquid clay solution which mixed up like cement then poured in and left to harden over a few days. This worked very well at first and provided fine looking vertical walls that were very rigid. Then after a whole summer of hot dry weather where we were hoping for more rain, the fall delivered lots of cloudy overcast days with plenty of precipitation. So I found that as I moved around the pond fixing up the walls, we would get a few days of wet weather and the parts I had already fixed up would start to collapse. It was becoming a race against the season. I needed to get the walls fixed up and then install the liner before the earth became too wet to support the shape without the water in place.

The picture, right, shows several sections of the pond's upper wall supported by concrete blocks with plywood squares behind them. The clay slurry was poured down behind the plywood to set up and produce a smooth vertical wall.
At the top of the picture on the right you can see a concrete
slab set into the ground. This is the site of the future pump
house, arranged so it's below the final water level of the pond.
The trench leads from the pump house to the edge of the pond where
the intake pipe comes up over the edge and back down into the pond
where it will connect up to the system of pipes in the bottom of
the pond under the biofilter material. This means no hole in the
liner under the water level which avoids lots of problems.
After several attempts at finishing the walls, only to have previous sections collapse before I was finished, I had a marathon session with friend Mike, and we managed to shore up all the way around on both levels of the pond, without any collapses. The next step was to build a wooden 2x4 ridge around the pond to act as a level edge. To this we attached sections of carpet to act as a protective layer for the liner. We added more carpet below, and sand on the horizontal surfaces.
Then finally we were ready for the liner itself. We had the help of some volunteers for the actual installation. This went very well and thank goodness, there was enough material (whew). Our careful calculations had been ok. The picture below shows the beginning of the 'pump house' .. a few concrete blocks rising on the concrete pad, on the right.
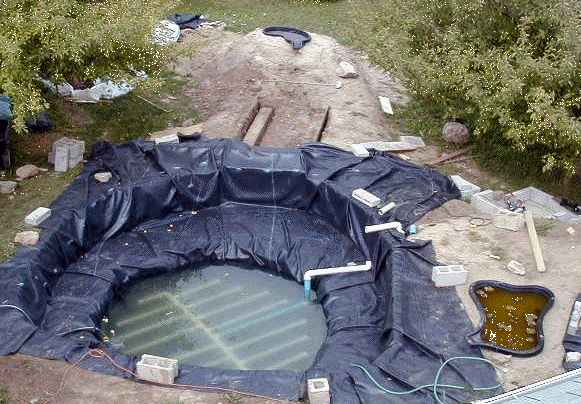
It was a huge relief to have the main liner installed and secure. It was none too soon as the weather continued to deteriorate and we soon had it full of water. Once this big step was complete, it seemed relatively easy to finish off the stream and waterfall leading into it. The pump house was well underway and was finished in a few days also. A small cedar roof was stained to match the woodwork on the house. The little 'roof ridge' is piano-hinged down its length and frees up the two sides of the roof to open to a vertical position to give access to the pump and plumbing. The two sides are hinged at their bases.
Once the plumbing was installed from the main pond intake to the pump and then to the two satellite ponds, the pump was finally connected and turned on. BIG SURPRISE. Even though the output was split into two directions, the flow from the Little Giant pump was so great that it overwhelmed the intermediate plastic pond that we'd inserted between a satellite pond and the main pond. This little pondlet, to the right in the picture above was completely unable to keep up with the volume coming in and overflowed the sides before the water could pass out through the spillway. We decided to remove the pond from the design and instead built a little stream directly from the upper filter pond to the main pond (right side, below).
The pond was finally ready for winter, with all the main plumbing installed, wiring buried, pump tested and working and water flowing approximately where we wanted it. The picture below shows the pond on November 11/01, ready for its first winter!

With the coming of spring in 2002, it was time to get the biofilter working. The plumbing was all in place and it was a matter of installing the filter medium in the bottom of the two main ponds. Rather than use the traditional lava rock or pea gravel I'd decided to use a special filter material that comes in rolls 2" thick by 56" wide. It's costly at about $15/running foot but is supposed to last 'for ever' - well at least a very long time! It's also light and easy to lift out and clean. The plumbing was ready for filtering in both the main pond and the larger satellite pond so we purchased enough material to cover the bottom of both ponds. The material is white and firm. It has a very large surface area which becomes colonized by the good bacteria which digest the fish waste and algae in the water, if the water is oxygenated. The picture below shows the bottom of the pond covered with the filter material, weighted down by some rocks.
After this, a thin sheet of porous garden material was laid on top of the filter layer and attached at the edges to a circle of 1" pipe. The pipe was attached to 4 nylon strings which lead up to the surround. This allows the thin sheet to be lifted out to bring out accumulated leaves and other debris. This filter material comes in rolls about 11' wide. You can just see the circle of pipe in the picture below, on top of the filter material, before the layer of porous material was added.
Once the cover material was installed, we filled up the main pond and added the filter material to the upper pond. Because the upper pond is only 2 feet deep I decided not to bother with adding the thin material on top of the main filter stuff because I can easily lift the filter material itself out for cleaning. Finally it was time to start circulating the water and see how the filter worked. By this time the water looked like pea soup, greenish and too cloudy to see any depth into it. After a week I could really see a difference and tell that the water was beginning to clear. After 2 weeks I could clearly see the first ledge and make out the bottom. By three weeks the water was clearer than I'd dare to hope it would ever be! I was very excited.
Next I concentrated on the waterfalls at the 'north' end and the decking beside the stream. The stream is actually about 20" deep and is a place for water hyacinths and other filtering plants, protected from fish. There is a surface dam that prevents surface water, along with the tiny floating pond plants from flowing directly over the falls. It's a piece of wood about 6" deep that lies across the top of the pond before the falls. An inch sticks out from the water and about 5" is below the surface.
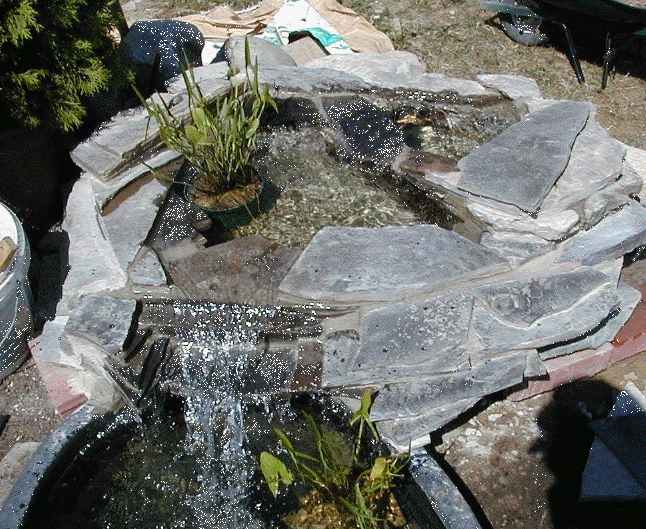
The north falls consists of a 'bowl' that receives one of the two outputs from the pump. This is built out of layers of flagstone or slate from local quarries. This bowl flows into a second bowl which flows into a pre-formed plastic pond with a spillway. The spillway flows into another container which I call my '3-D Falls'. This is a triangular shaped bowl with the front point of the triangle blocked and raised so that water also flows over the sides. This side water is then directed through a couple of mini-falls and some pea-gravel filtering. This creates a more interesting water path, in the shape of a 'U' lying flat, with the water flowing into the stream from both sides and the top of the 'U'.
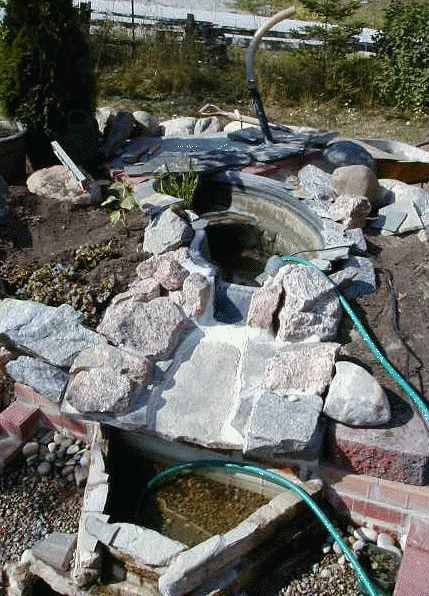
This shows the beginning construction of the upper north falls with the 1-1/2" delivery pipe from the pump coming through the poured concrete slab. The slab formed the base on which I mortared the rocks to create the falls.
That's the "3-Dimensional Waterfall" in the foreground. Water fills up the bowl and overflows the two sides as well as the front. There are holes in the bottom for winter drainage.
The challenge here was to have a sealed, waterproof transition
from the constructed containers made of rocks and mortar, into the
plastic insert. This was the only part of the pond not contained
within a liner. 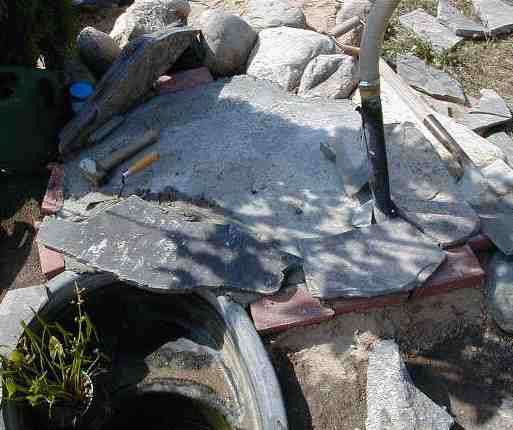 The
piece of slate in the foreground on the right is tilted forward so
any water runs down into the plastic section. At the top, I built
two bowls, one around the pipe, which flows into a second one,
which flows into the plastic section. After the slate was mortared
into place, I initially had some damp seepage through the mortar.
I sealed it up with applications of waterproof concrete paint on
the inside.
The
piece of slate in the foreground on the right is tilted forward so
any water runs down into the plastic section. At the top, I built
two bowls, one around the pipe, which flows into a second one,
which flows into the plastic section. After the slate was mortared
into place, I initially had some damp seepage through the mortar.
I sealed it up with applications of waterproof concrete paint on
the inside.
Below you can see the finished construction. The water is delivered to the small section, upper right, flows into the next section with the plant, then transitions into the plastic insert. I did some fine mortar work with small pieces of the flagstone to contain the water flow into the plastic insert. The flat surfaces get a small amount of splash and make good places to grow moss.
In the summer of 2002, with great excitement, we introduced about 40 small koi into the pond. By this time the water was crystal clear and the filtering appeared to be working great. It was fantastic to watch the fish swimming around in the clear water. Could have watched them for hours, moving in schools, breaking up, reforming, a few solos etc. When moved, the koi are restless in the first 24 hours, particularly the males. Sure enough, we found a couple of fish had leaped up the east falls, swum up the stream and into the upper pond (to the right). We were able to watch one fish make the labourious journey, fighting against the flow in the shallow water and finally arriving in the upper pond. About 6 fish made this journey, all within the first 24hrs. None attempted it after that.
The best part is that the fish quickly became very tame. By putting my hands in the water with food, they soon learned to swarm into my hands to get the food. This has become a daily routine and it is amazing to be able to handle the fish in this friendly way on a regular basis.
After a while we tried swimming with the fish. They mostly kept their distance from us but didn't seem to mind our presence. It's great to be able to float around in the clear water knowing it's entirely cleaned with biofiltering.
A few frogs appeared early in the construction and stayed with us right through. They hung out in the satellite ponds and streams rather than the main area with the fish.
 As winter approached, I
took in some of the water hyacinths along with the tropical Canna.
It was a very harsh winter 2002-3 and there were mountains of snow
covering the whole pond area. I kept the pump running long after
frost came and ice covered the surfaces. Because of the shallow
depth of the north falls, ice bridges were in danger of diverting
the flow outside the pond area. As well, as the snow piled up, I
worried I'd never be aware of any flow problems or freeze up and
didn't want to risk burst pipes and a damaged pump. So I
disconnected the pump and brought it inside sometime in December.
As winter approached, I
took in some of the water hyacinths along with the tropical Canna.
It was a very harsh winter 2002-3 and there were mountains of snow
covering the whole pond area. I kept the pump running long after
frost came and ice covered the surfaces. Because of the shallow
depth of the north falls, ice bridges were in danger of diverting
the flow outside the pond area. As well, as the snow piled up, I
worried I'd never be aware of any flow problems or freeze up and
didn't want to risk burst pipes and a damaged pump. So I
disconnected the pump and brought it inside sometime in December.
As the winter got more severe, I was glad to have the pump inside, but was worried about the fish. When the thaw finally came in April, there was a big snow load on top of deep ice. Not content to wait for nature, I shoveled off the ice with a snowshovel and as it continued to melt, broke it up and heaved it out of the pond in pieces. The water level was initially high and overflowing the sides as the drain pipe was frozen. I tried boiling water without success. It unfroze in its own good time.
As soon as I uncovered all the stream paths, I reconnected the pump and started it up. Once I got it primed to pull the water over the edge, it ran well. The intake from the undergravel filter is 3" pipe as far as the little pump house, where it reduces to 2". Then I was able to pump the water level down a bit and the ice I was heaving out reduced it some more.
I sadly discovered that all the fish in the upper pond had perished, likely because it froze solid. Only about 24" deep. However only one fish died in the main pond. It was great to discover them all in a group under the ice as I was getting rid of it.
The pond evolved in 2003 under its own steam. I expanded the lily
population by splitting the tubers and adding pots. They produced
a great show of flowers. The koi started eating the buds but soon
there were so many they gave up! After I pumped in some rainwater
from the ditch, we had an algae bloom for a while, but once the
pond filters adjusted, it was crystal clear for the whole summer.
There was a lot of green algae on the waterways, falls and also in
floating clumps. I like the look of this and mostly left it alone.
We planted different kinds of thyme in the cracks of the
flagstones and have 'thyme wars' going on to see which ones do
best.
This summer I'd planned to build the East Falls (right) but had to spend most of my free time in the city. Next year ..
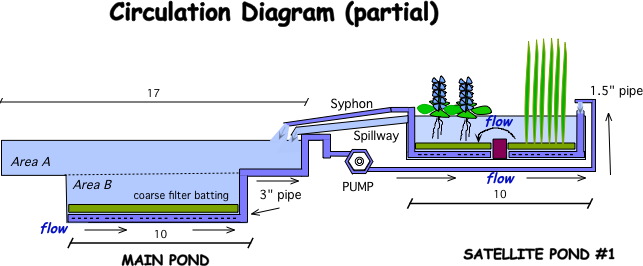
Below is a diagram of the 'filter pond' and main pond showing the flow through the undergravel
(without gravel!) filters including the upflow and then downflow in the 2 sections of the filter pond.
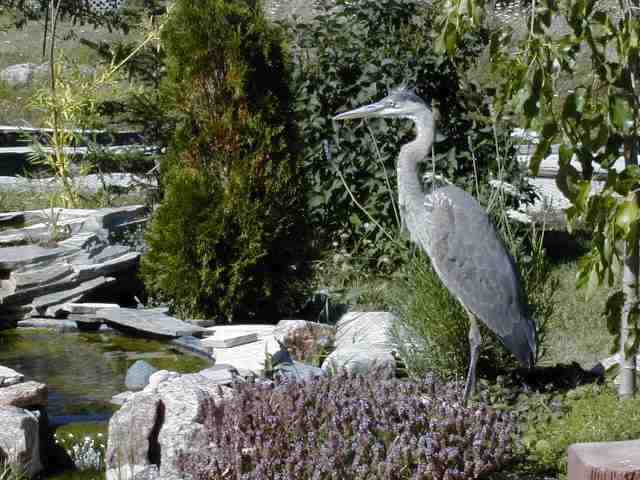
This fall (2003) the heron network discovered our pond.
On September 7th I was taking a walk around the place, admiring how much everything has grown.
Suddenly Jennifer shouted for me to look up ... I glanced up just
in time to see a huge bird coming in for a landing at the front of
the house .. it definitely looked like some kind of well designed
war bird .. a mini helicopter gunship or perhaps a primitive
pterodactyl. It was certainly on a mission and this was not a
social call!
I'd been hearing about this heron for several days now from neighbours .. since we'd both been away, it had apparently been visiting our pond and dining on the koi living happily and very tamely there.
We both raced around to the front and then crept the last few feet to see if we could watch without disturbing. Sure enough, there it was, away from the edge of the pond, and looking around for the fish. It was an amazing bird, very large, its eyes and beak probably above my waist when it extends its very long neck. We watched it for a while as it moved around the pond, but then it began to stride purposefully towards the area where the fish were innocently swimming around. The water is very clear so you can see them perfectly.
We stood up and moved towards the bird to discourage it from getting closer to the fish. It watched us, but then noticing the fish swimming close to the surface, advanced towards them and us, showing little fear.
Just then, our cat Felix appeared and on seeing the giant bird, began to approach it very low to the ground. The bird noticed it but didn't seem very concerned (MUCH bigger than the cat!). JP and I watched transfixed. Mr. Felix, though slight, is a notorious hunter and catches everything from rabbits and chipmunks to birds and mice. Not good. The cat got closer and the bird was clearly watching both the cat and the fish.
Finally the cat having got only a few feet from the bird, made a dash at it. The big bird just casually sprang straight up into the air out of reach, with hardly any apparent effort or concern. Instead of taking off into the distance, it merely flew about 10' away and landed at the other end of the pond with a few graceful flaps of its huge wings. The cat, perhaps miffed at being outwitted by a mere BIRD, now ignored it and we were able to watch it for quite a while. It was obviously highly motivated to stick around for a possible tasty lunch, presumably having been rewarded by this in the past. We figured the fish numbers are noticeably reduced (around 25, down from around 35). It patiently started grooming itself with its beak (no fish up where it was) and I crept closer to take some pictures.
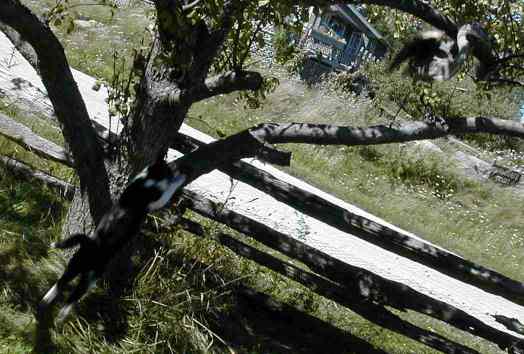
This was no problem and I got to within about 10 feet of it. Finally it flew over to an apple tree a little further away and Mr. Felix then noticed it again. He stalked up to the tree and I managed to get a picture of him in full flight leaping at the tree just as the heron began to take off from the branch.
Even after this, the hungry heron still circled around, landed on the roof and stuck around quite a while, trying to get closer to its sushi lunch.
Just another day in the country, I suppose ... I think this is why I want to be here though.
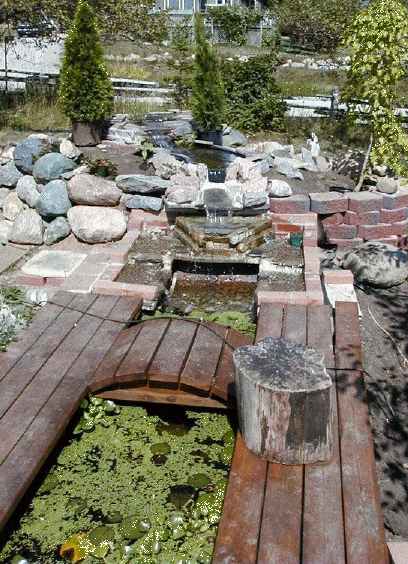
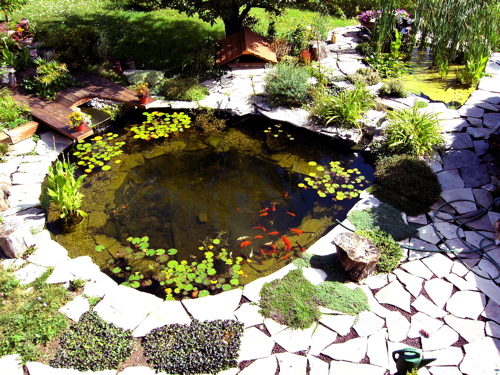
Here's a more recent pond picture. You can see the weed
growth and their little 'flowers' that stick above the pond
surface. Dragonflies seem to love to land on these things. Also
you can see the massive growth of thyme on the opposite side.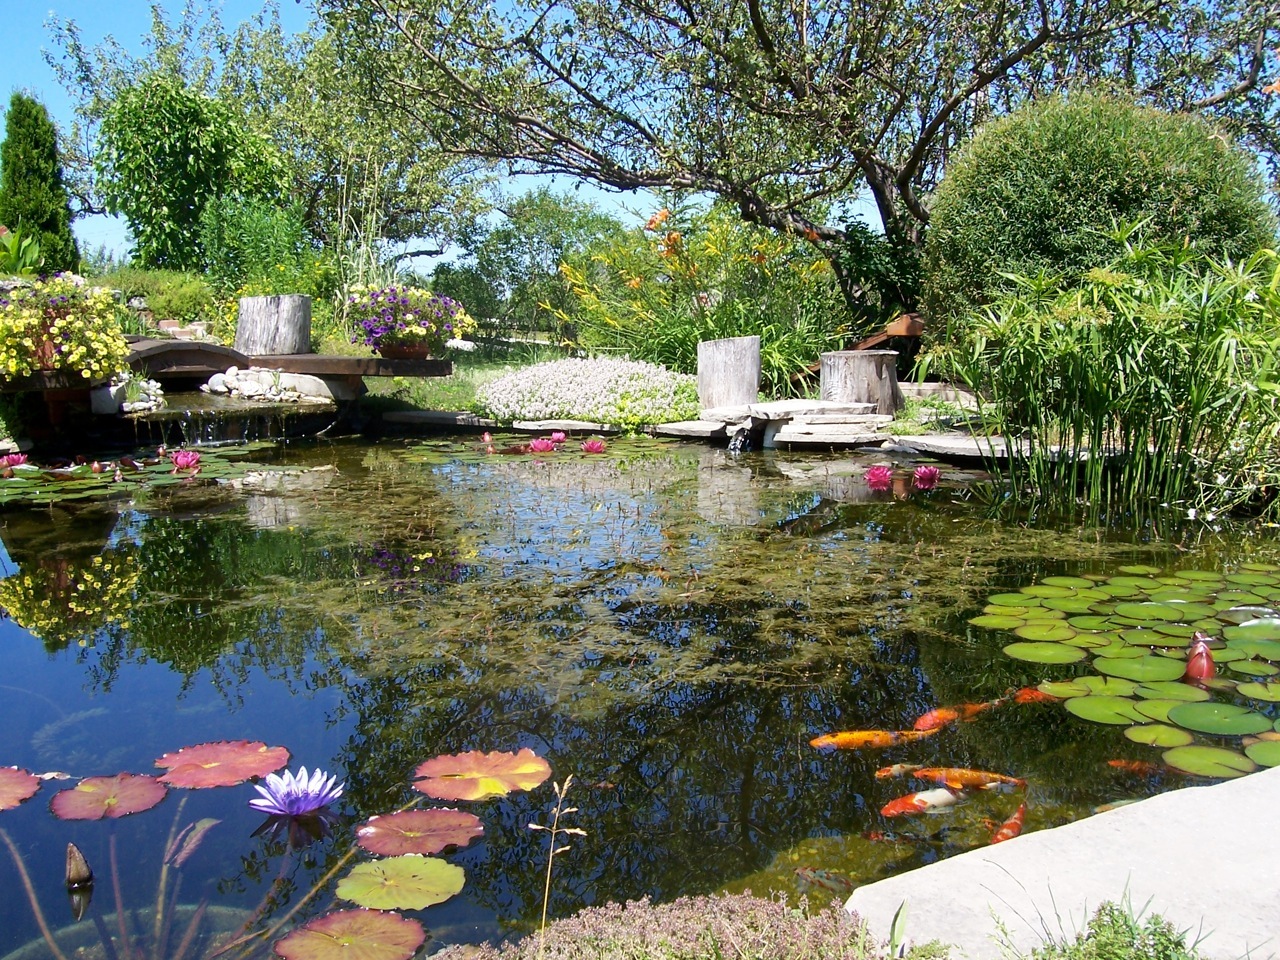
![]()